Implementing External Authorization with Envoy Proxy and NestJS
In modern microservices architectures, securing endpoints and managing user access is paramount. As services grow in complexity, ensuring that only authorized users can access certain resources becomes a critical concern. This is where Envoy Proxy comes into play. Envoy is a high-performance proxy designed for cloud-native applications, offering advanced features like load balancing, service discovery, and observability. One of the powerful features Envoy provides is the ability to integrate with external authorization services.
By leveraging Envoy’s ability to forward authorization requests to an external service, you can centralize and standardize access control across all your services. This approach allows you to create a consistent security layer that simplifies management and enhances security. Implementing role-based access control (RBAC) ensures that users only have access to the resources and actions they are permitted to perform based on their roles and permissions. This not only bolsters security but also helps in maintaining compliance with organizational policies and regulations.
In this article, we will demonstrate how to set up external authorization using Envoy Proxy and NestJS, ensuring robust access control in a microservices environment. By integrating Envoy with an external AuthService, we can create a secure and scalable system that checks user permissions and roles before allowing access to sensitive operations, such as deleting an order.
The complete source code for this example is available at the end of this article
Why Use This Approach Instead of a Cloud-Based Identity Provider
Advantages
Flexibility and Customization
- Custom Authorization Logic: Allows for tailored authorization rules beyond the default capabilities of cloud-based identity providers.
- Fine-Grained Control: Provides detailed control over routing, load balancing, and filtering, essential for complex microservices environments.
Disadvantages
- Complexity: Setting up and maintaining Envoy and an external AuthService adds complexity compared to using a single, integrated cloud-based identity provider.
- Potential for More Bugs: More components and custom code increase the potential for bugs and require more thorough testing and debugging.
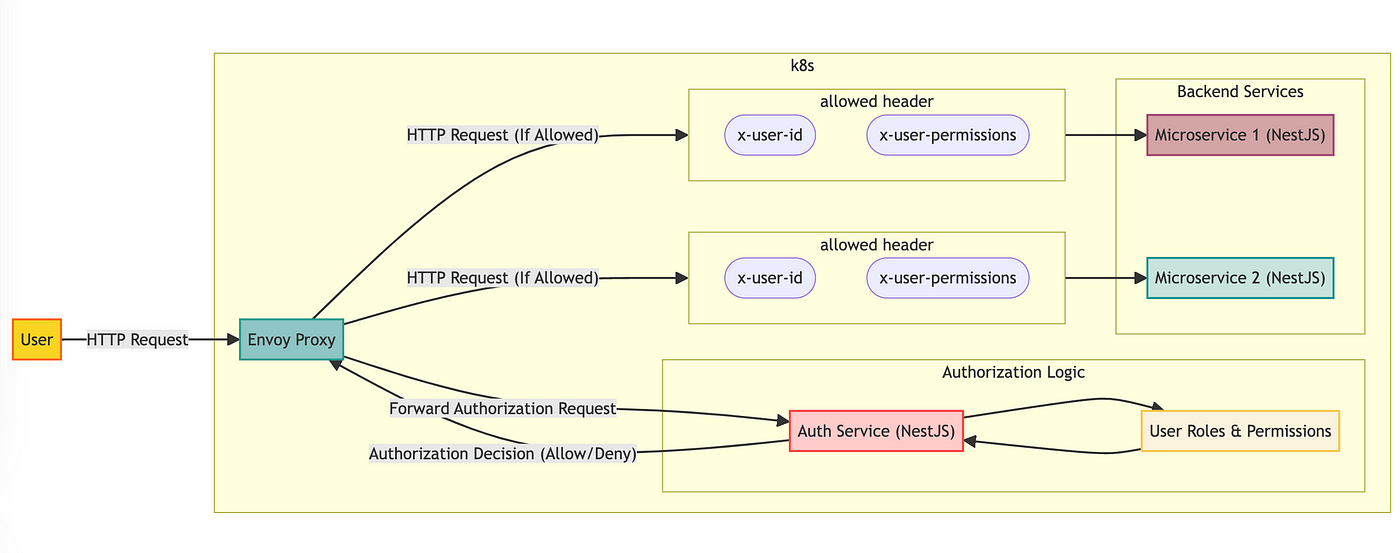
Request Flow for Authorization in Microservices
Auth Service
The AuthService handles user authentication and generates JWT tokens, which are essential for ensuring secure communication between microservices. Here’s an explanation of its key components and how they work together.
Default Users with Roles and Permissions
For testing purposes, The AuthService initializes a set of predefined users , each with specific roles and permissions. These users are defined in the UsersService and include roles such as ADMIN, MANAGER, and USER.
// auth/src/users/users.service.ts
import { Injectable } from '@nestjs/common';
import * as bcrypt from 'bcryptjs';
import { Role } from '../auth/roles-permissions';

@Injectable()
export class UsersService {
  private users: any[];

  constructor() {
    this.initUsers();
  }

  private async initUsers() {
    this.users = [
      {
        userId: 1,
        username: 'john',
        password: await bcrypt.hash('changeme', 10),
        roles: [Role.ADMIN],
      },
      {
        userId: 2,
        username: 'chris',
        password: await bcrypt.hash('secret', 10),
        roles: [Role.MANAGER],
      },
      {
        userId: 3,
        username: 'maria',
        password: await bcrypt.hash('guess', 10),
        roles: [Role.USER],
      },
    ];
  }

  async findOne(username: string): Promise<any | undefined> {
    return this.users.find((user) => user.username === username);
  }

  async findById(userId: number): Promise<any | undefined> {
    return this.users.find((user) => user.userId === userId);
  }

}
Roles and Permissions
// auth/src/auth/roles-permissions.ts
export enum Permission {
  CREATE_ORDER = 'create_order',
  READ_ORDER = 'read_order',
  UPDATE_ORDER = 'update_order',
  DELETE_ORDER = 'delete_order',
}

export enum Role {
  ADMIN = 'admin',
  MANAGER = 'manager',
  USER = 'user',
}

export const RolesPermissions = {
  [Role.ADMIN]: [
    Permission.CREATE_ORDER,
    Permission.READ_ORDER,
    Permission.UPDATE_ORDER,
    Permission.DELETE_ORDER,
  ],
  [Role.MANAGER]: [
    Permission.CREATE_ORDER,
    Permission.READ_ORDER,
    Permission.UPDATE_ORDER,
  ],
  [Role.USER]: [Permission.CREATE_ORDER, Permission.READ_ORDER],
};
Validate JWT and Set User Context to Request Headers
The AuthController is responsible for handling requests related to authentication and authorization. When a request arrives at the endpoint /auth/ext-authz, it validates the JWT and sets user-related headers based on the decoded token.
// auth/src/auth/auth.controller.ts
import { Controller, All, Headers, Res } from '@nestjs/common';
import { JwtService } from '@nestjs/jwt';
import { Response } from 'express';
import { RolesPermissions, Role } from './roles-permissions';
import { UsersService } from '../users/users.service';

@Controller('auth')
export class AuthController {
  constructor(
    private readonly jwtService: JwtService,
    private readonly usersService: UsersService,
  ) {}

  @All('ext-authz/*')
  async authz(
    @Headers('authorization') authHeader: string,
    @Res() res: Response,
  ) {
    console.log('entered authz');
    if (!authHeader) {
      return res.status(401).send('Authorization header missing');
    }

    const token = authHeader.split(' ')[1];
    if (!token) {
      return res.status(401).send('Token missing');
    }

    try {
      const decoded = this.jwtService.verify(token);
      const userId = decoded.sub; // Assuming 'sub' contains the user ID
      const user = await this.usersService.findById(userId);
      const roles = user.roles.join(',');
      const permissions = user.roles
        .flatMap((role) => RolesPermissions[role as Role])
        .join(',');

      res.setHeader('x-user-id', userId);
      res.setHeader('x-user-roles', roles);
      res.setHeader('x-user-permissions', permissions);
      res.end();
    } catch (err) {
      return res.status(401).send('Invalid token');
    }
  }
}
1. x-user-id Header
- Purpose: This header contains the unique identifier of the user making the request.
- Usage: Downstream services can use this ID to fetch additional user information or log activities for auditing purposes.
2. x-user-roles Header
- Purpose: This header lists the roles assigned to the user, such as ADMIN, MANAGER, or USER.
- Usage: Roles are used to determine the level of access and control the user has within the application. Downstream services can use this information to enforce role-based access control (RBAC).
3. x-user-permissions Header
- Purpose: This header lists the specific permissions granted to the user, derived from their roles.
- Usage: Permissions provide fine-grained control over what actions the user can perform. Downstream services can check these permissions to decide whether the user is authorized to perform a specific action.
Envoy Configuration
Envoy Proxy acts as a gateway, forwarding requests to the appropriate services while handling authentication and authorization by interacting with an external authorization service. This section details how Envoy is configured to integrate with the AuthService for validating JWT tokens and enforcing role-based access control.
Envoy Configuration Overview
The following configuration sets up Envoy to forward requests to the AuthService for authorization checks. It includes listeners for incoming requests, routes to the appropriate services, and clusters representing those services.
static_resources:
  listeners:
    - name: listener_0
      address:
        socket_address:
          address: 0.0.0.0
          port_value: 3000
      filter_chains:
        - filters:
            - name: envoy.filters.network.http_connection_manager
              typed_config:
                "@type": type.googleapis.com/envoy.extensions.filters.network.http_connection_manager.v3.HttpConnectionManager
                stat_prefix: ingress_http
                route_config:
                  name: local_route
                  virtual_hosts:
                    - name: backend
                      domains: ["*"]
                      routes:
                        - match:
                            prefix: "/v1/orders"
                          route:
                            cluster: order_service
                        - match:
                            prefix: "/v1/products"
                          route:
                            cluster: product_service
                          typed_per_filter_config:
                            envoy.filters.http.ext_authz:
                              "@type": type.googleapis.com/envoy.extensions.filters.http.ext_authz.v3.ExtAuthzPerRoute
                              disabled: true
                        - match:
                            prefix: "/auth/login"
                          route:
                            cluster: auth_service_cluster
                          typed_per_filter_config:
                            envoy.filters.http.ext_authz:
                              "@type": type.googleapis.com/envoy.extensions.filters.http.ext_authz.v3.ExtAuthzPerRoute
                              disabled: true
                        - match:
                            prefix: "/auth"
                          route:
                            cluster: auth_service_cluster
                http_filters:
                  - name: envoy.filters.http.ext_authz
                    typed_config:
                      "@type": type.googleapis.com/envoy.extensions.filters.http.ext_authz.v3.ExtAuthz
                      transport_api_version: V3
                      http_service:
                        server_uri:
                          uri: http://auth.default.svc.cluster.local
                          cluster: auth_service_cluster
                          timeout: 0.250s
                        path_prefix: /auth/ext-authz
                        authorization_request:
                          allowed_headers:
                            patterns:
                              - exact: authorization
                        authorization_response:
                          allowed_upstream_headers:
                            patterns:
                              - exact: x-user-id
                              - exact: x-user-roles
                              - exact: x-user-permissions
                  - name: envoy.filters.http.router
                    typed_config:
                      "@type": type.googleapis.com/envoy.extensions.filters.http.router.v3.Router
Key Components
- Admin Interface: Enables access to Envoy’s admin interface for monitoring.
- Listeners: Configures Envoy to listen on port 3000 for incoming traffic.
- Filter Chains: Applies the HTTP connection manager filter, which handles routing and other HTTP-related tasks.
- Route Configuration: Sets up routing rules for different endpoints (
/v1/orders,/v1/products,/auth). - HTTP Filters: Configures the external authorization filter to forward requests to the AuthService for validation.
authorization_responseBlock : This block specifies how Envoy should handle the response from the external authorization service (AuthService) and which headers to include when forwarding the request upstream.
authorization_response:
  allowed_upstream_headers:
    patterns:
      - exact: x-user-id
      - exact: x-user-roles
      - exact: x-user-permissions
One crucial security feature of this setup is that the values for x-user-id, x-user-roles, and x-user-permissions are set by the AuthService and cannot be modified by the client. This ensures that these headers cannot be tampered with, providing a secure way to propagate user context across services.
In this configuration, the /auth/login /v1/products endpoint is accessible without authentication. This is achieved by disabling the external authorization filter for this route. Route such as /v1/orders is protected and require valid JWT tokens.
Order Service
The OrderService handles CRUD operations for orders and ensures that only authorized users can perform these actions. By integrating with Envoy and the AuthService, the OrderService can enforce role-based access control, ensuring that users can only perform actions they are permitted to.
Orders Controller
The OrdersController defines the endpoints for creating, reading, updating, and deleting orders. It uses the PermissionsGuard to enforce permissions and the Permissions decorator to specify the required permissions for each action.
// orders/src/orders.controller.ts
import {
  Controller,
  Get,
  Post,
  Body,
  Headers,
  Res,
  UseGuards,
  Param,
  Put,
  Delete,
} from '@nestjs/common';
import { OrdersService } from './order.service';
import { Permissions } from './permissions.decorator';
import { PermissionsGuard } from './permissions.guard';
import { Response } from 'express';

@Controller('v1/orders')
@UseGuards(PermissionsGuard)
export class OrdersController {
  constructor(private readonly ordersService: OrdersService) {}

  //...

  @Delete(':id')
  @Permissions('delete_order')
  async remove(
    @Headers('x-user-id') userId: string,
    @Headers('x-user-permissions') permissions: string,
    @Param('id') id: string,
    @Res() res: Response,
  ) {
    await this.ordersService.remove(id);
    return res.status(204).send({
      message: 'Order deleted successfully',
    });
  }
}
Permissions Guard
The PermissionsGuard ensures that only users with the required permissions can access certain endpoints. It checks the permissions specified in the Permissions decorator against the user's permissions. Using the ExecutionContext, the guard retrieves the request object and extracts the user ID and permissions from the headers. It then compares the required permissions, obtained via ExecutionContext methods like getHandler() and getClass(), with the user's permissions to determine if access should be granted or denied.
// orders/src/permissions.guard.ts
// ...

@Injectable()
export class PermissionsGuard implements CanActivate {
  constructor(private reflector: Reflector) {}

  canActivate(context: ExecutionContext): boolean | Promise<boolean> | Observable<boolean> {
    const requiredPermissions = this.reflector.getAllAndOverride<string[]>(PERMISSIONS_KEY, [
      context.getHandler(),
      context.getClass(),
    ]);
    if (!requiredPermissions) {
      return true;
    }

    const request = context.switchToHttp().getRequest();
    const userId = request.headers['x-user-id'];
    const userPermissions = request.headers['x-user-permissions'];

    if (!userId) {
      throw new BadRequestException('User ID missing');
    }

    if (!userPermissions) {
      throw new ForbiddenException('Permissions missing');
    }

    const permissionsArray = userPermissions.split(',');

    const hasPermission = () =>
      requiredPermissions.some((permission) => permissionsArray.includes(permission));

    if (!hasPermission()) {
      throw new ForbiddenException('Forbidden');
    }

    return true;
  }
}
ExecutionContext
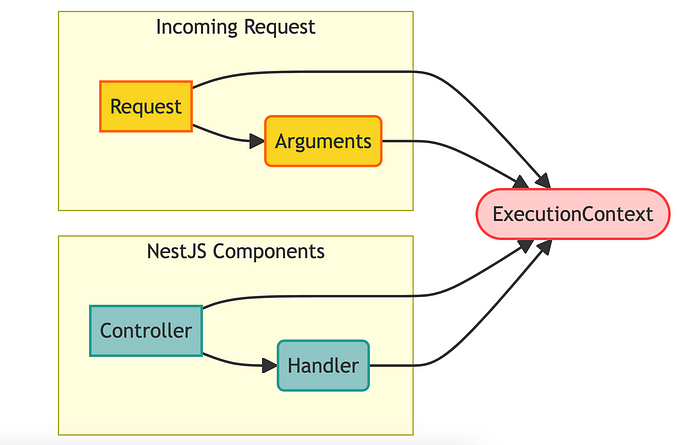
ExecutionContext, which coordinates with the controller and handler.Key Methods in ExecutionContext:
switchToHttp(): Access the underlying HTTP request and response objects (if applicable).getClass(): Get the class of the controller handling the request. This method is used to retrieve metadata and other configuration information defined at the controller class level, which might include role-based access control settings or other class-level annotations.getHandler(): Get the specific handler method being executed. This method is essential for accessing metadata and configuration set at the method level, such as specific permissions required to execute the method or other custom annotations that control access to the endpoint.getArgs(): Get the arguments passed to the handler.
Permissions Decorator
// orders/src/permissions.decorator.ts
import { SetMetadata } from '@nestjs/common';

export const PERMISSIONS_KEY = 'permissions';
export const Permissions = (...permissions: string[]) => SetMetadata(PERMISSIONS_KEY, permissions);
Full GitHub Repository
For the complete implementation, including all configuration files and code, visit the https://github.com/kelvin-bz/auth-envoy-k8s-microservices. This repository contains contains helm charts for deploying the services in a local Kubernetes cluster.
Conclusion
In this article, we demonstrated how to implement role-based access control in a microservices architecture using Envoy Proxy and NestJS. We configured Envoy to handle external authorization requests, integrated an AuthService to validate JWT tokens and set user permissions, and implemented an OrderService with strict permission checks. This setup ensures secure and controlled access to your microservices, enhancing the overall security posture of your system.
Read more articles about NestJS : https://kelvinbz.medium.com/list/nestjs-eafb7de3e562